
Thursday, October 20, 2011
Fav fall pic
Sunday, October 16, 2011

I didn't realize how long it had been since I had been on here!!! Guilt has set in, and I am back! The original reason for my hiatus was the big move, but since that was way back in AprilI now have no excuse. So to start things off I have something amazing to share and it comes in the form of FOOD! We went on our annual trip to the apple orchard last week and it was a blast as usual! This time Lincoln was old enough to actually pick the apples and he went nuts. And I am so surprised that he didn't have a huge stomach ache because he ate upwards of 4 apples before we left the orchard! We ended up leaving with 22 pounds in total (which is the smallest amount I have ever picked) and now I am scrambling for recipes for anything apple. I came across this recipe for apple cinnamon bread and after I changed a few things I came up with, well, heaven! So here it is:
APPLE CINNAMON BREAD
1/2 cups all purpose flour
3/4 tsp baking soda
1/2 tsp cinnamon
2 extra large eggs
1/2 cup brown sugar
2/3 melted margarine
3 medium apples
1/2 cup chopped pecans
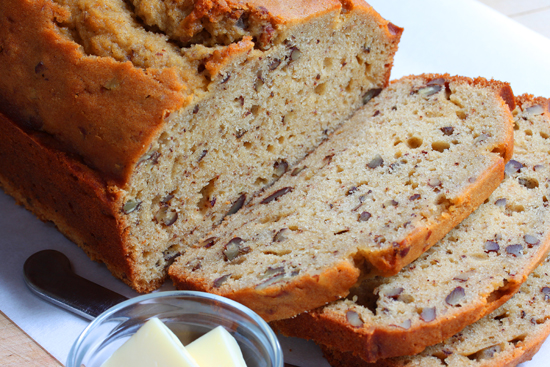
- Set rack in the middle of the oven and preheat oven to 350. Grease a loaf pan - set aside.
- Combine flour, baking soda, and cinnamon in a bowl and mix well to combine. Set aside
- In a separate bowl whisk the eggs and sugar until eggs are broken apart. Add the melted margarine and mix until just combined.
- Quickly peel and grate the apples (and when I say quickly I mean quickly! I took my time and they ended up brown. When you grate the apples smaller they turn brown before you know it!) into a shallow bowl - there should be about 2 cups of grated apple.
- Fold in the flour mixture into the egg mixture then fold in the apples and pecans.
- Scrape the batter into the prepared pan and smooth the top with the back of a spatula. Bake until the bread has risen and a toothpick comes out clean - about 35-40 minutes.
- Cool the bread in the pan for 5 minutes then take it out of the pan to cool on a wire rack. Slice and serve with butter.
Thursday, March 24, 2011
A moms idea of a vacation
 This is my absolute favourite journal page so far!! And it's funny how it's about one of my favourite days in a long time. I needed a day to myself so my wonderful husband watched the kids so that I could take off and go to a coffee shop for the afternoon. I sat and drank and amazing cup of coffee, ate a yummy wrap and bowl of soup and just read. For some reason sitting in a public place has always given me anxiety. I always thought that people were looking at me and wondering why I was alone. Now that I'm a mom I don't care what people think... I'm just happy that I had time by myself!! I ended up getting quite far in my book (Eat, Pray, Love) too. Funny how in the book she talks about American's inability to just sit and enjoy doing nothing. Technically I wasn't doing nothing, but I was doing something just for me for the pleasure of it!
Sunday, March 20, 2011
Food for thought...
First of all, yes I deserve the worst blogger in the world award! I've done nothing on here because all my spare time has been spent closing house deals, painting the new house, packing the current house and tomorrow I go back to work. I've done some creating but haven't posted it. So my goal is to update over the next few weeks.
To start: Here's some food for thought! The first was the result of a spaghetti dinner.

The second: A celery flower!!

Friday, January 28, 2011


During this whole journal process one of the things I wanted to do most was wreck the cover. There's just something about it that seemed so wrong but so right. I've always been about taking good care of books so that they didn't discolour, rip, get pages bent, etc. I was so desperate to channel my inner 'rebel' and make the cover of this book my own... but I wasn't ready. Whatever I decided to do on the cover I knew it had to be amazing but I still had so many control issues. Having done over a quarter of the book now I knew I was ready... This is it!! And I have to say I think it's pretty amazing!
Monday, January 24, 2011
Exploring technique


 This page I dedicated mostly to trying out some new techniques. It's called "Happy Accidents of the Audio Appendages". My mom said one thing and my ears hear something COMPLETELY different! I ended up laughing so hard that I was crying like a baby and people were looking at me like I belonged in a "special" hospital. Anyway I painted a basic dark background and then went over it quickly with a lighter colour to give it some depth.
 After that was dry I added the light swirl for the title and date. Then, by another happy accident, I dropped some water on the page and when I went to wipe it off there were these neat looking water marks! So I added some more water and went to town lol
Then in this picture you can see the circles....... recycling!! I lightly painted on some small bubble wrap (let me tell you it was incredibly difficult to keep Laney from popping every single one!) and pressed down on the page. Finally, after all the painting was done I drew on the flourishes with a black fine tip Sharpie marker.
Hours of work but I am SO proud of these!
Along with some inspiration from another art journal blog (Daisy Yellow) this page came to life. I saw something like this on the blog and decided to do a project with Laney. I drew a bunch of squares on a piece of paper and told her to just make some designs. She was having a rough go of it so I did a few just to show her. Then I decided that my squares looked so neat that I would do an entire page. A few HOURS later I was finished! This first picture is after I just did the black outline with a thin Sharpie.

This second picture is when it's all finished. I thought that filling in all the little doodles with a thin marker would be easy... boy was I wrong! Although it was easy to keep in the lines it took so much longer than anticipated. The final result made it all worth while though :)

Subscribe to:
Comments (Atom)